
All of a sudden it’s Week 5 of the One Room Challenge hosted by Linda at Calling it Home. When we started this project, Justin wished farewell to April, and I have to admit, it’s flown.
Thanks to everyone who commented and sent good vibes during our time of need last week–you propelled us over the hump, and we got SO MUCH done. I’m really excited to show you everything in the big reveal. Can Week 6 GET HERE ALREADY?!!
(PS – If you missed any of the other updates, see them here: Week 1 | Week 2 | Week 3 | Week 4 )
Here’s some of what we accomplished last week:
New sun room lighting.

Our original plan called for recessed lighting to replace our tragic ceiling fans, but in the spirit of less cost, less mess, and less chance of disrupting potential asbestos (we have untested popcorn up there), we ended up going with a very low profile flush mount LED light. These puppies were only $30 a piece at Home Depot, and they look about 80% like can lights anyway. The ceilings in the sun room are kind of low, so I just wanted something to blend in, and these fit the bill. They’re really bright, too. Definitely a good substitute.
Plexi-glass cabinet inserts.

Our two remaining cabinet doors (the ones that go on either side of the sink) got plexi-glass inserts installed. There are lots of good tutorials out there, but I used the one here at Confessions of a Serial DIYer. The plexi-glass was kind of tough to cut, but all in all the project wasn’t too bad, and the cost for two fairly large doors was only about $35.
Completed back splash installation.
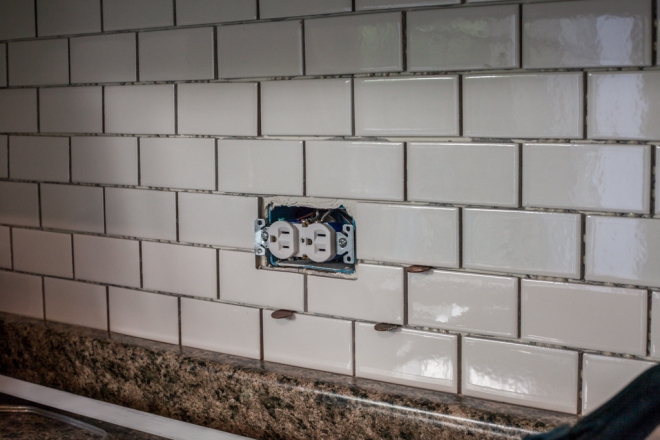
Justin took off work last Friday and spent almost the whole day finishing the back splash tile. I think I wrote before that these subway tile can be cut with nippers, and that is technically true, but I’m told it is also very laborious and annoying to do it this way. In the end, Justin ended up buying a small tile saw with a friend. It was $50 to rent the saw for 8 hours at Home Depot and only $100 to buy it, so the two of them split the cost and now have it forever for about the same amount. Pretty savvy.
Completed FLOORS!
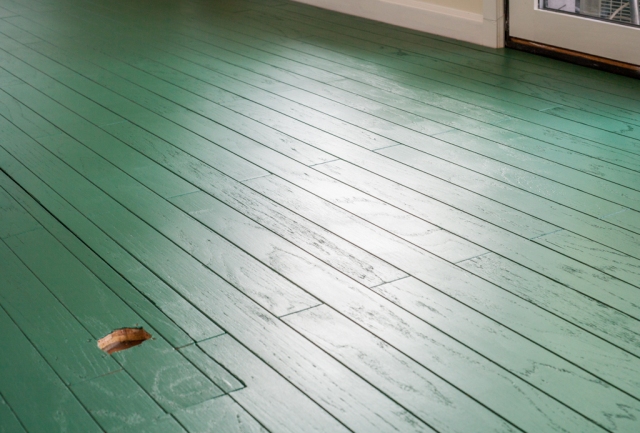
We finished the floors, and yes–they look amazing. After lots of reading, I determined that priming your floors before painting is really only necessary if you are dealing with raw wood. So after sanding and cleaning thoroughly (for me this meant vaccuming obsessively with a shop vac), we put down two coats of floor paint and two coats of polyurethane. I ended up opting to use poly for three reasons–added shine, greater durability, and ease of cleaning. After seeing/feeling the difference from adding the polyurethane, I definitely think it was the right move. The pic above was taken before the poly. Even with a satin finish, the floors looked quite matte.
**An important note to anyone who might be interested in painting your floors: You MUST use a water-based poly if you’re using a latex floor paint. I didn’t see this information in any of the articles I read, but luckily the helpful dude at Sherwin Williams clued me in me. Apparently you can use latex-based paint over oil-based, but not the other way around.**
The one thing left on the project to-do list is to grout and seal the tile. Other than that, all we really have to do is move the furniture back and get the place styled up. I’m planning to move the desk that was originally next to the cabinets to the other side of the sun room and bring in a pair of these excellent vintage rattan chairs I picked up recently.

With all the physical labor needed in the kitchen, I haven’t totally worked out all my styling choices, but I’m looking forward wrapping up the next week with some fun stuff.
Now get on over to Calling it Home and check out the other participants! And don’t forget to check back next week for all the exciting reveals!

Seriously, now I want a green floor!! Gorgeous! I can’t wait to see it all.
LikeLike
Thanks so much! I know painting isn’t for every wood floor, but I was glad to get to try it out on these. It’s so fun!
LikeLike
Love, love, love that floor.
LikeLike
Thanks, Marty! That makes two of us. 🙂
LikeLike
i’ve been living vicariously through you. we are in the process of getting new windows installed and then we can focus on remodeling our kitchen. i’m most interested in seeing how your plexi glass cabinet doors look, as it’s something i’ve toyed with. (i love the open shelving look but i can’t imagine the grease and dust that would accumulate).
your subway tiling looks great. we’re also thinking of doing that, though i think we’re going to have professionals do it for us. honestly, until reading this, it never occurred to me that it could be done any other way but professionally.
last, will you have your popcorn looked at? i’m sitting here worried.
LikeLike
Haha, we will send in a sample and have the popcorn tested. If it’s okay, we’ll scrape, and if not, we’ll probably just paint it with a sprayer. So I don’t know which outcome to wish for–better end result, or less work. 🙂 The plexi-glass installation was actually not too hard! I also think the plexi-glass looks plenty good, though of course you could have custom glass cut for a little more $$. I’ll pass along your tile comments to my husband. He did a great job on the glass tile in our last house and has done awesome with this project too. I’d imagine that a pro tiler could have done it a lot faster, but Justin volunteered himself! It’s definitely a doable DIY, but as with everything, it depends so much on what you want to take on. Hope you enjoy your new windows! I bet that will make a huge difference!
LikeLike
Wow! You got so much done last week! The cabinet doors with the glass inserts look amazing! And I can’t wait to see that floor! Soooo good! Looking forward to the reveal next week!
LikeLike
Thank you, Sam! I have no idea where the momentum came from, but I’m glad it did!
LikeLike
This is going to be so good…can’t wait to see the finale!!
LikeLike
Thank you, Traci! I’m super excited to show it off!
LikeLike
….but I don’t want to wait a week to see your reveal!!! Lol! Everything looks so good!!!!
LikeLike
Haha, me either, Amber! I’m getting impatient to see everyone’s rooms! It will be here before we know it. But first–the WEEKEND!
LikeLike
Thanks for the shout out on the plexi glass installation! They look great. I’ll be back to see the grand reveal! 🙂
LikeLike
Thanks for the great tutorial! You made it easy enough to convince my husband. 🙂 And your doors looked FAB, by the way!
LikeLike
Wow! You made so much progress. I have to admit, I’m super curious to see the floors in the finished space. They look awesome!
LikeLike
Thanks, Julia! I think I’m happier with the floors than I expected. With a little shine from the polyurethane, they look even better!
LikeLike
This looks seriously great! I don’t know why painting our subfloor didn’t occur to me instead of replacing the linoleum, but it’s in pretty rough shape so it probably wouldn’t look nearly as great as yours. Can’t wait to see the finished product!
LikeLike
The floor ended up looking so good! Can’t wait for next week!!!
LikeLike
Thanks, Erin! Me too!
LikeLike
Brittany – those floors! I really love painted floors and the color you chose is perfection. 🙂
LikeLike
Thanks so much, Brit! It took a few swatches, but I love the color, too. It turned out even better than I imagined.
LikeLike
Pingback: Kitchen Update | ORC Reveal! | white dog vintage
Well… can see you worked on minor details in your projects the glass in the cabinets was something new you learned in the project, nice. Led lights sure is a great purchase, it being eco-friendly.
LikeLike
Yes, putting glass in the cabinets turned out to be a pretty simple project, but it really made the space seem less cramped. Love those LEDs, too! Eco friendly and easy to install!
LikeLike
Putting the glass in the cabinets turned out to be pretty easy, but it really made the sink area feel less cramped. The LEDs are so great! Eco-friendly and easy to install, plus they are really bright!
LikeLike