
There was snow on the ground when we found these three 1964 Paoli chairs at an estate sale last winter.
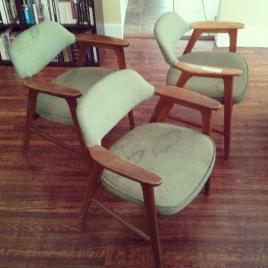
Since then, they’ve spent a lot of time chilling out in the basement, waiting to get a little TLC. But for everything there is a season, and apparently summer is the season for Paoli chairs, because they are finally done!

You can follow the upholstery process for chair three below.
Stripping
The process of stripping these Paoli chairs was far less dramatic and eventful than the loveseat, which was dangerous and, frankly, a little disgusting. I started with the chair upside down to get easier access to the staples.

The good news is that all the staples were on the narrow underside of the seat back. Once those were removed, I detached the fabric and moved on to the seat.


I must have seemed like I needed some assistance, because Jellybeans came out to supervise my efforts.

Boom! With the staples gone from the seat, the stripping process is done. QC came back to check the cushion density one last time, just to make sure it was good for sitting and all.


Sewing the Seat Cushion Cover
You’ll have to excuse me if some of this seems like one of those cooking shows where the host suddenly pulls the finished dish out of the oven. Since this was the third of these chairs I did and the second in the same fabric, I had already cut my material to size. However, I do promise to cover measuring for yardage, pattern making, and cutting fabric in future posts.
The seat cushion cover consists of two parts: the seat and the boxing. The original chair also had piping, but I opted to go sans piping for this time because I wanted a clean, modern look and thought a simple cover accomplished that better. I did use piping on the first chair, and that looked great, too.
With the seat and boxing fabric already cut, the first step was to trace the outline of the seat cushion onto the seat fabric. On the first chair, I did a truly embarrassing amount of seam ripping before finally accepting that this cushion is an irregular shape, and eyeballing it while you sew is not an especially effective way of getting that shape right.
This time I broke out the chalk pencil to make sure my seam placement was exact. It’s okay to draw on the correct side of the fabric–the side that will be showing on the final product. A lot of the chalk line will not show after you have sewn, and what does show can be patted out with a damp cloth. I made the curve of the cushion my boundary, marking for my seam where the cushion began to slope downward. This cushion had a little bit of edge there, which made the process pretty easy.

Next, I brought out the boxing (two pieces, already sewn together). I wanted to place the side seams of the boxing near where the back leg of the chair meets the seat so that they would be less visible. This is also the way the previous seat was assembled, so it’s not as if I had to think of that genius strategy on my own.
I laid out the boxing so that the seams met the seat and the same place on both sides. Then, I made a horizontal marking on the seat fabric to indicate where the boxing seam should go.


Before sewing, I pinned the boxing to the seat fabric.

When pining, I made sure to do the following three things:
- Arrange the top side of the seat fabric and the boxing so they are facing each other (ie–the seat fabric is facing up, and the boxing is facing down), and the boxing is inside the seat cushion. That way, when I folded the boxing back over, it was underneath the seat and ready to cover the bottom of the cushion.
- Begin by pinning the BOTH boxing seams on the horizontal markings I just made. If you start with just one, there is no guarantee you will distribute the fabric exactly as needed for the other one to line up.
- Pin on top of the yellow line drawn on the seat fabric. It wasn’t visible once I added the boxing, so the pins became my guide when sewing, like so:

Upholstering the Seat Cushion
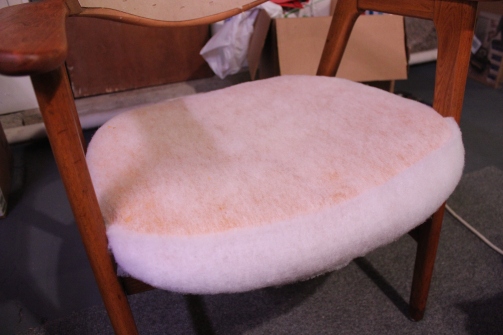
Then I covered the whole seat with a half layer of dacron and stapled it to the bottom, just to even out the cushion and freshen the padding a little bit. I also noticed on the other chairs that there could be a slight bulge where the seat cushion met the plywood bottom, so I put an extra strip of dacron across the front to smooth out that area. At this point, my cushion looked like this:
Now I was ready to add the seat cushion cover. It fit pretty tightly, which I just what I wanted. I smoothed as I went, making sure the seams were where I wanted them, and the grain of the fabric was straight.
After flipping the cushion over, I pulled the boxing down and secured it to the bottom. The top and bottom of a piece should always be stapled before you move to the sides. I checked the front periodically to make sure I was pulling evenly and not getting my seam out of alignment. When completely stapled, the bottom looked like this:

To complete the seat, I added a piece of cambric, which is a fancy word for the black dust cover that’s always hanging off the bottom of old sofas. Strictly speaking, this is optional, since cambric doesn’t really do anything functional. It does, however, make the whole job look more finished and keeps strings from the raw edge of your fabric and bits of dacron from being visible. Attaching cambric is about the easiest part of the entire project. Just cut it to shape and staple around the outside. It’s nice to fold the edge of the cambric under before stapling, but it won’t unravel, so if there isn’t enough fabric to fold, no one will be the wiser.

Upholstering the Seat Back
I try to reuse the original materials from furniture whenever possible. It’s greener and easier on the wallet. The cotton batting from this chair was in fine condition, so back on it went. To add extra padding and a smooth finished surface, I added a layer of dacron over the batting and stapled it to the back.


First, I upholstered the front side of the seat back by draping the fabric over the front and securing it on the back top and underneath the bottom of the seat. As with the seat cushion, I smoothed and stapled the top and bottom of the fabric before doing anything with the side, like this:

When I had stapled the back top and bottom all the way across, I needed to make a release cut. This small split in the fabric where the arm meets the back enabled fabric to be wrapped around the arm

After making release cuts on both sides, I finished stapling the top and bottom of the back. When I came to the arms, I folded the extra fabric from the cut underneath before stapling. The front and back then looked like this:


Now I was ready to move to the seat back and was kind of almost done. I positioned the top of the fabric at the top of the seat back and draped the rest backwards over the seat front. I stapled across the top to secure, then added a piece of cardboard tack strip and stapled again in the same manner. This ensures a straight, clean edge on the back of the chair.


I added a half sheet of dacron to cover over where the tack strip was applied and smooth out the whole surface. Then, I flipped the back fabric down and stapled it to the underside of the seat back. I folded the fabric under as I stapled so that no raw edges were exposed. With the bottom completed, only the sides were still loose.


The sides of this back were finished with a nail head trim. To apply nail head, all I needed was nail head (of course) and a mallet to whack the tacks with. Some of the original tacks bent when I removed them, so I had to get new ones to finish this chair. At $1.50 for 24, they were a minor expense.

And voila!
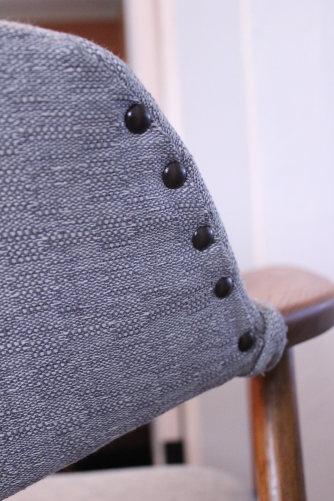
To be honest, I forgot to take a picture when I first attached the nail head, which is why the above pic is not a sketchy basement pic like the rest AND already has cording where the seat back meets the arm. Oops! That’s a teaser for you as we head into the LAST STEP(s).
Sewing Double Welt Cording
Double welt cording is good for finishing areas of furniture where wood meets upholstery. When sewn, the raw edge of the fabric hides on the bottom of the cording, and it can be attached with staples. Back at the sewing machine, I cut a small piece of fabric and two short pieces of 5/32″ cording.


You can get a cording foot or a double cording foot for your sewing machine, but I don’t have either yet, so I used the zipper foot that came with my machine. I attached it on the left side and moved the needle to the left position so it could get as close as possible to the cording.

I folded fabric over the first piece of cording and sewed, then arranged the second piece right next to it and folded over again.This time, the seam needed to be placed in between the two pieces of cording. This is where the zipper foot isn’t totally adequate to the project. The cording is too thick for the presser foot to be lowered, but if the presser foot is left up, the threads on the back side can get pretty messy. When only dealing with small pieces like this, I prefer to hand sew. On the finished cording, notice I made the fabric about a 1/2″ longer than the cording. This makes it much easier to staple.


I positioned the cording on the joint of the arm, stapled, and that’s a wrap (no pun intended). The last chair could finally be joined up with its twin.

As much as I enjoyed working on these chairs, I am excited to get them the heck out of my basement. They need to move on to forever homes where they can be displayed and loved, as the furniture gods intended.

Pingback: Upholstered! Mid-century Loveseat | white dog vintage
Do you happen to know the approximate yardage of fabric used in these chairs? We have a pair we are about to redo and were curious.
LikeLike
Hi Alyson! I think I remember it taking about a yard exactly, so 1.5 yards per chair ought to give you a little wiggle room. This is based on a fabric with no pattern or real nap, and I railroaded it. Hope this helps!!
LikeLike
You are super even in renovating chairs with cool fabric. Nice
LikeLike
Aww, thank you, Maria! You’re too kind!
LikeLike
I bought the same chairs at an antique shop and plan to follow your directions. I am worried the serving is too much for me but I will hope for the best. Thanks for the detailed guide!
LikeLike
Sewing… Oops…
LikeLike
Thank you for sharing this process, as I have four chairs exactly like these that need recovering. Couple of questions if you don’t mind answering.
Do you think you could recover the seat without sewing two pieces together? I was thinking of just stretching the fabric and stapling.
How did the arms look with out adding the piping to finish it off?
Thanks!
LikeLike
I know this is ages old but what did you do with the wood to make it look so much better? Strip and stain it all? New coat of finish?
LikeLike
Yep, I sanded it down and re-stained it!
LikeLike
I’m seeing this 7 years too late
I obtained one of these chairs when a neighbor put it out on the curb. I should have offered to buy the matching chair that was not torn
By now you have sold them for sure
They are difficult to find
LikeLike